How I Meal Prep Lunch for a Week Plus Helpful Tips for Meal Prep

My friends and coworkers often ask me about weekly meal prep. I am very passionate about healthy eating. In multiple conversations with friends and coworkers, I have noticed most people want to do it, but find it difficult to justify the time and question the cost savings. As someone who has prepped meals for years, I am a firm believer that it saves time, money, and provides many health benefits.

Here are the common questions people ask me about meal prep:

  • What do you make during meal prep?
  • How long does it take to cook?
  • Does your food taste good at the end of the week?
  • Is it cheaper than eating out?

As a member of corporate America, I find myself constantly influenced by the dark side of donuts, candy, and/or some sort of processed food. In the beautiful city of Chicago, it’s even more difficult, having restaurant upon restaurant within blocks of my apartment calling my name with cuisine from around the world. I believe that life is short and you should enable your body to experience these great restaurants.

Notice that I used the word “enable” versus “treat myself.” What I mean by this is that I believe there’s always a balance between treating yourself and eating too much of the wrong stuff. With that said, I feel that one meal we can take control of and help us throughout our day is lunch. Lunch is the meal that creates the break in our work day. Regardless if you’re in corporate, hospitality, or health care, you need to eat lunch. It is far too easy to go with what everyone else is having (hamburger, processed sandwich, etc) and let this meal get away from us.

This is where meal prep comes into play and making a healthy choice can really be easy with weekly meal prep. Meal prep enables your body to truly enjoy cheat meals (I’ll explain that later) without the guilt. The purpose of this message is to not only answer the questions above but outline them in a way that logically proves that meal prep is worth your time and money.

Though you can meal prep for any time of day, I will keep this overview to lunch – as it’s the most common meal everyone asks about. Lets get started!

What do you make?

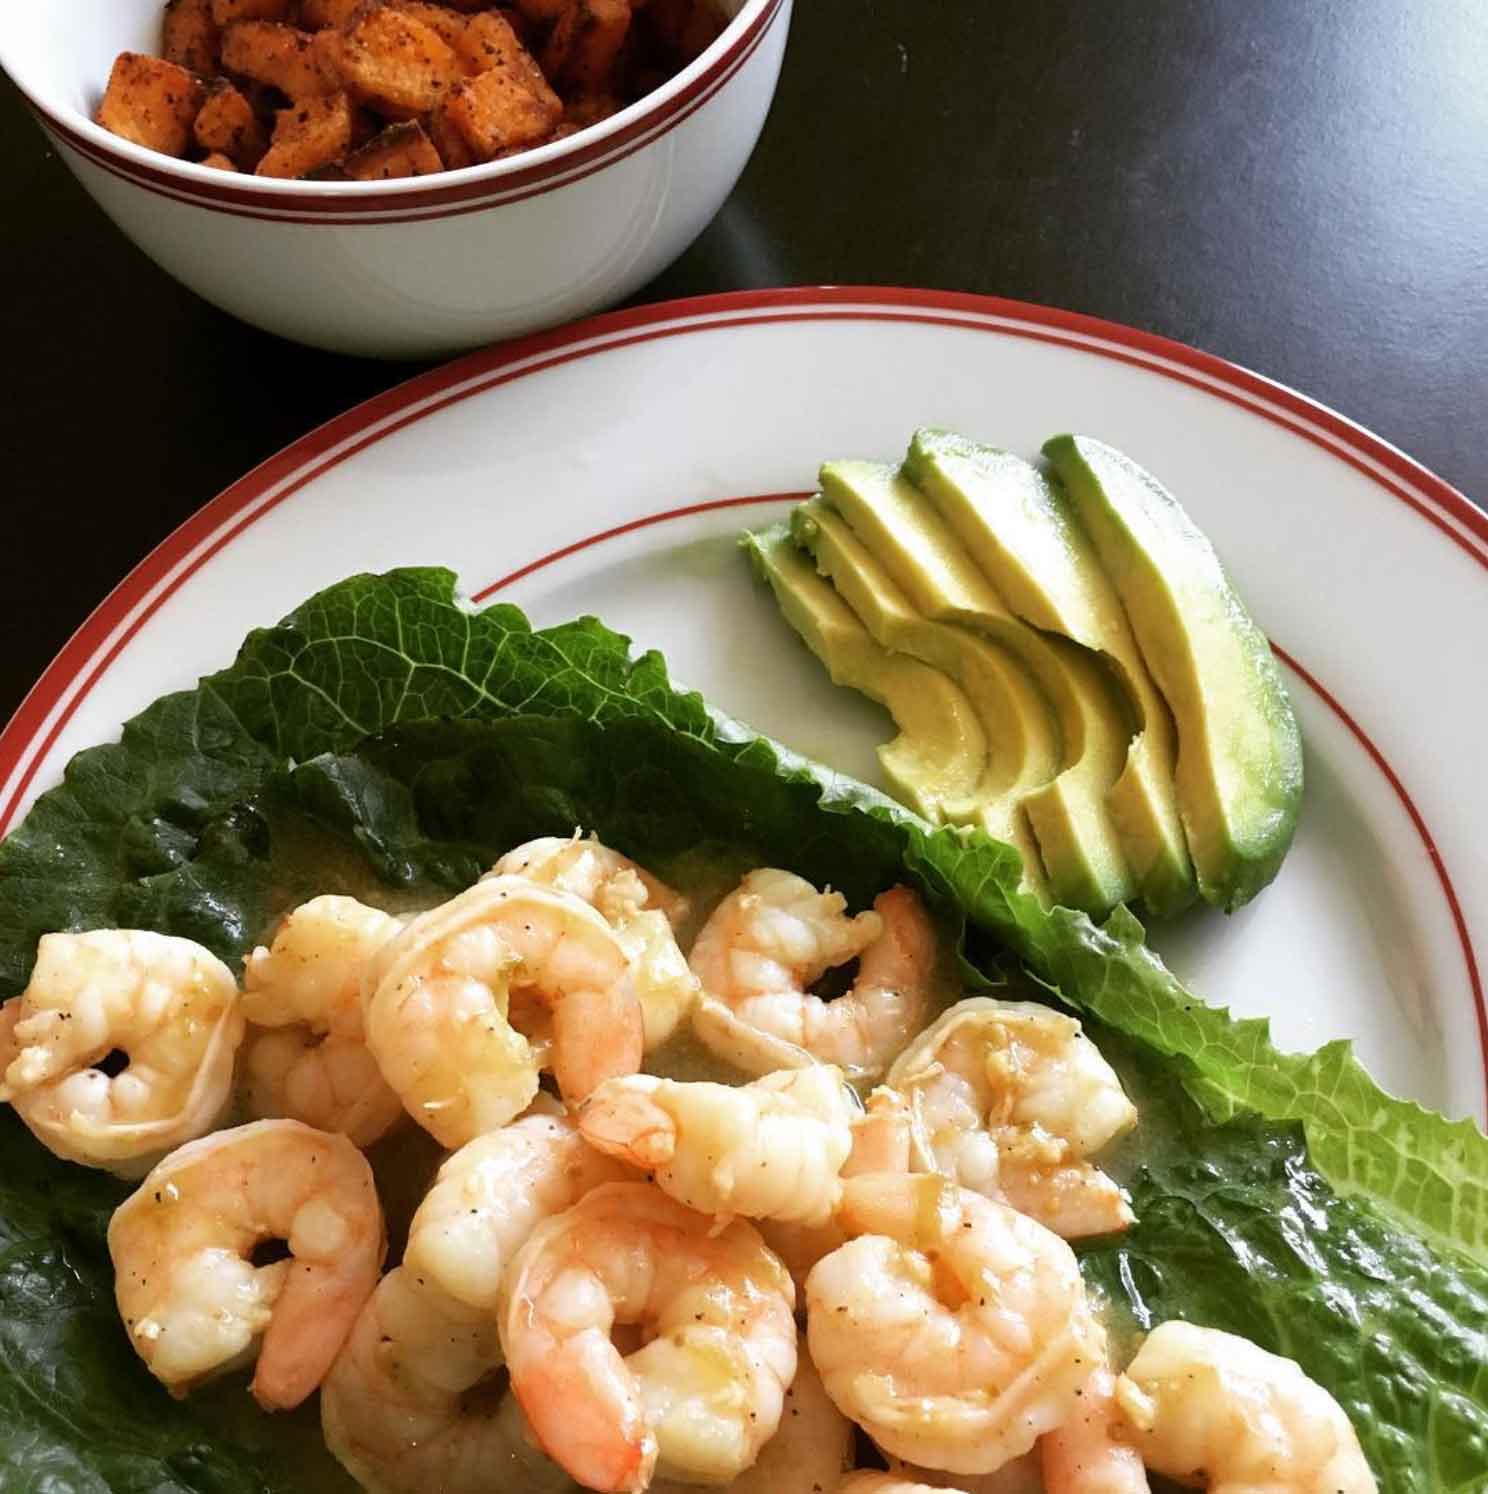
The answer to this questions depends on the type of food you eat. Personally, I prefer the Paleo lifestyle and my food choices are limited to lean meats, seafood, vegetables, fruits, nuts & seeds, and healthy fats. I look for a balanced portion of a protein, greens, and carbohydrates for lunch. This allows me to have my break during the day and be able to get back to work without the afternoon dip.

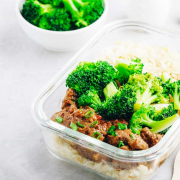
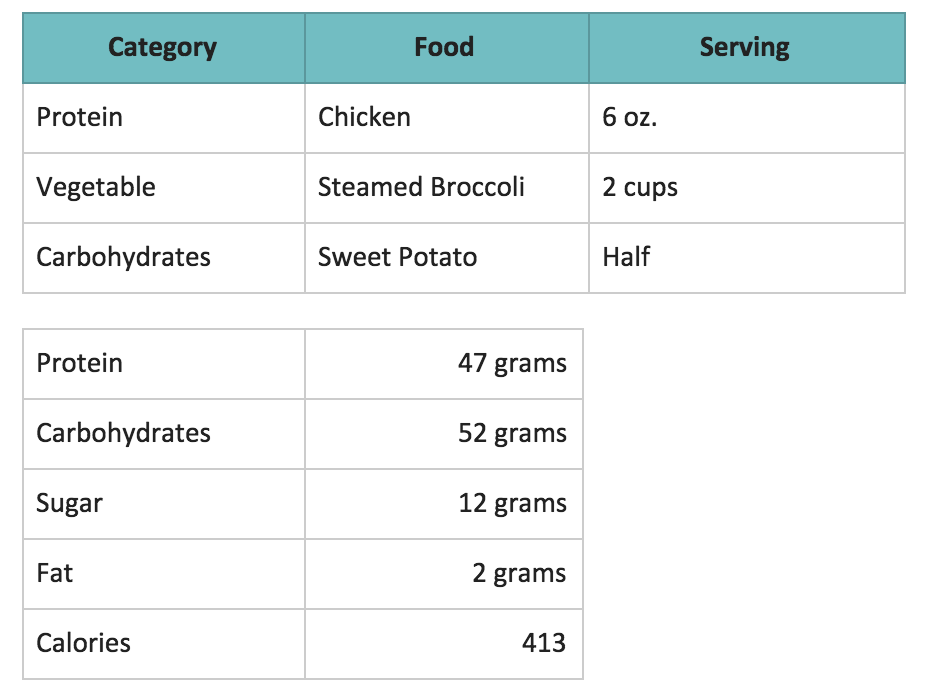
Here’s what a typical lunch may look like:

Meal prep tips

How long does it take to cook?

I start with skinning the sweet potatoes and throw them into the oven since they take the longest. I time the broccoli start time to end the same time as the sweet potatoes. Once those two are complete, I move onto the chicken and grill it outside, which takes roughly 30 minutes. The food prep and cooking time will take you roughly 1.5 hours in total.

Related: check out even MORE food prep tips for various steps in the process to help make this easy time, money and progress saver a regular part of your routine.

Meal Prep = Time Saver

I always like to compare this to the alternative. Let’s look at both scenarios of going to get food and bringing it back to your desk versus eating there. I did time trials by walking with coworkers to grab their lunch and I found that the average time was roughly 15 minutes to go there and back. Total time throughout the week is an hour and 15 minutes. Ok, we’ve saved some time!

In a different situation, let’s look at how much time is saved in comparison to when you eat at a restaurant. I began timing this trial from the time we sat down and began to eat. I excluded any sit down restaurants that included a server since the lead times varied by person and restaurant. I came to the conclusion of an average 15 minute eating time. Combining that with travel time, you’re looking at 2 hours and 30 minutes saved per week.

Does your food taste good at the end of the week?

This one intrigued me for a while as I did notice that my chicken would become rubbery or not taste as good toward the end of the week. A trick you can use to help your food last and taste better longer is with your freezer. I do my meal prep on Sundays and put Monday and Tuesday’s meals in the refrigerator. The rest goes into the freezer and I pull out one meal each day throughout the week. Monday, I pull out Wednesday, etc.

Is it cheaper than eating out?

Yes, meal preparation will save you money. Below is an outline of the cost comparison between purchasing groceries vs. eating out. Please note, I am measuring groceries for a single person, using the chicken/broccoli/sweet potato meal outlined above.

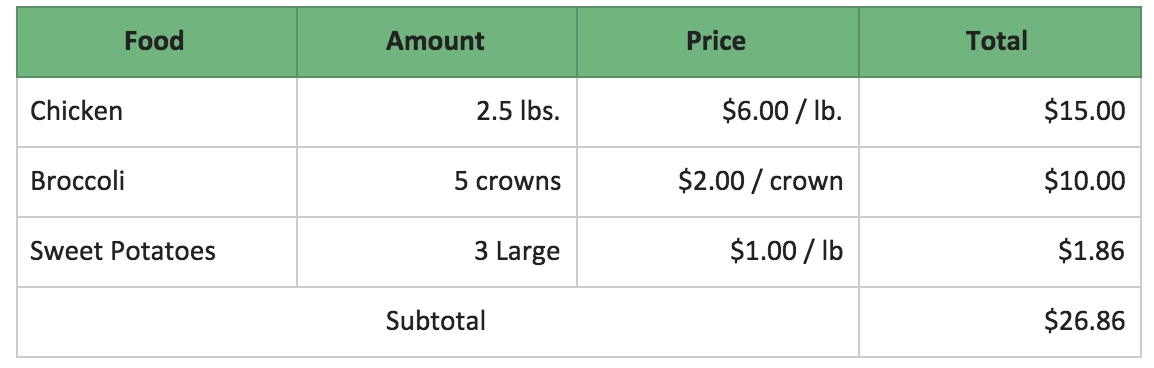
If you go out to eat each day, lunch costs anywhere from $6 (typical fast food options) to $10 (Chipotle, Panera, etc.) depending on where you go. Add a sugary Coke, that’s another $2.00. The numbers speak for themselves.

Final Thoughts on Meal Prep

Regardless if you’re training for a race, show, or looking for ways to be healthier, I am a firm believer that meal preparation can bring value to your day and life. You will not have to worry about answering the question, “What should I eat for lunch?” You have the opportunity to learn to cook new meals and try something new every week. Not only will meal prep save you money on a weekly basis, but you’ll get more out of your day. We can’t get more time in a day, but we can make the most of it.

For more about meal preparation and fitness, follow me on Facebook and Instagram!

Post written by FFC Union Station member Omar R. 


Try This Quick Lower Body Workout

Pressed for time? Many of us struggle to fit exercise into our already busy days. Additionally, many of us think that a workout needs to be be at least 45 minutes to count. Throw that thought out the window and get your fitness in 30 minutes or less while competing against the clock! (Compound body moves, like these, also help to make your workout more efficient). Try this quick lower body workout to work your legs to the max – minimal equipment needed!

Equipment needed: Medium weight dumbbells, a mat and a body bar (for balance).

Set up your equipment and start your clock. See how many times you can get through your circuit, and challenge yourself to improve your total rounds performed on the next attempt. (And be sure that form is always your top priority)!

Warm Up

Warm up with one round of the following (30 seconds each):

  • Jogging in place
  • Alternating body weight lunges
  • Jumping jacks
  • Body weight squats

Lower Body Workout Challenge

Choose five of the following moves to rotate as many times as you can in 25 minutes.

Weighted Walking Lunges (10 reps per leg)

Walking lunge lower body workout

Walk through the lunge instead of stepping your feet back together. Make it more difficult with a dumbbell in each hand. (Perform a basic lunge if space is an issue).

Dumbbell Deadlifts (15 reps)

Dumbbell deadlift lower body workout

Start standing straight, then bend, keeping your shins vertical and your back straight, hinging just at the hips. Return to standing for one rep.

Jumping Lunges (30 seconds)

Jumping lunge lower body workout

Start in a lunge, then swing your arms to help propel yourself off the ground as you switch legs midair, landing on the opposite leg.

Ice Skaters (30 seconds)

Ice skater 1 lower body workout  Ice skater 2 lower body workout  Ice skater 3 lower body workout

Leap to your right and tap your left foot behind you, then leap to the left. For added difficulty during this lower body workout, tap your hand to the ground or keep your back leg elevated for a count before leaping to the other side.

Related: try this workout, then

Lateral Squats (10 reps per leg)

Lateral squats lower body workout

Perform a squat, step your left leg in so your feet are together, then step your right leg out to perform another squat. Repeat side to side. Make it more difficult by holding a weight in front of you.


Try the best gym in Chicago for free!


Single-leg Romanian Deadlifts with Knee Raise (15 reps)

Romanian deadlift 3  Romainian deadlift 2 lower body workout

Romanian deadlift 1 lower body workout  Romanian deadlift 4 lower body workout

Hinge at your hips, keeping your body in as straight a line as you can (grab a body bar if you need help balancing).

Jumping Squats (30 seconds)

Jumping squats lower body workout

Perform a squat, then leap straight into the air, landing softly back into a squat.

Lunge Hops (30 seconds)

Lunge hops lower body workout

Perform a lunge, then leap straight into the air without switching legs, landing softly back into your lunge. Switch legs after 15 seconds.

Cool Down

Cool down with one round of the following:

Standing Quad Stretches (30 seconds per leg)

Standing quad stretch lower body workout

Grab your body bar or the wall for balance, gently pull your knee into your backside until you feel a stretch in the front part of your leg.

Low Lunges (30 seconds per leg)

Low lunges lower body workout

You can use your dumbbells if you can’t reach the ground.

Downward Facing Dog (30 seconds)

Downward dog lower body workout

Try to keep your back and legs straight as you lean your chest down for this hamstring and shoulder stretch.

Post written by an FFC contributor.


Pilates Transformation: Pre and Post-Hip Surgery Rehab

Recovering from surgery, or even a minor injury, can be frustrating and discouraging. In the time it takes to recover, the body can change drastically. In 2014 I sustained a hip labral tear and ended up getting surgery to repair it. After surgery, I was in a hip brace for two whole months and, as a result, my body became uneven – I had extreme muscle imbalance, severe tightness and my body was just completely out of alignment. I seriously questioned if I was going to face these issues for the rest of my life. After I graduated from physical therapy at FFC’s East Lakeview NovaCare, my therapist recommended a Pilates transformation.

I knew nothing about Pilates, except that all the apparatuses looked like a bunch of torture devices. Needless to say I was skeptical that these weird machines could actually help me. To be honest, I thought some of the stuff was odd during my first few sessions, but then I started to fall in love with it as I began to see my body transform. All those issues I had after surgery were completely fixed with continuous Pilates sessions.

Related: Pilates makes you mentally stronger. Here are 4 ways.

I was in awe that this method of exercise literally healed me. Pilates ignited a passion in me – it helped me so much that it made me want to be a teacher to help others like myself. Since that turning point post-surgery, I have graduated from the FFC Pilates Teacher Training Program and am a Pilates trainer at FFC South Loop.

Due to pre-existing conditions, I tore the labrum of my other hip and got surgery in 2015. Having practiced Pilates both pre and post-surgery this second time around, I can definitively say Pilates helped me recover faster by reducing the muscle imbalances, alignment issues and overall tightness I experienced during the first surgery.

Related: click here to sign up for a free 30-minute Pilates consultation at FFC!

So, if you are hoping to get stronger before a surgery, recovering from a hip (or other type of) injury or just want to improve your overall balance and alignment, here are a few specific ways a Pilates transformation can help you. Pilates:

  • Restores alignment of the body and corrects muscle imbalances
  • Helps correct the body’s natural tendency for overcompensation when trying to cope with alignment or imbalance issues
  • Strengthens and lengthens muscles around the hip area
  • Helps speed up recovery time with pre-surgery preparation and with scar tissue issues post-surgery
  • Enhances overall core strength to assist with balance and confidence in falling
  • Reduces muscle tightness and increases flexibility and range of motion

Both before and after surgery, I experienced tightness in my hip flexors, quads and lower back; my Pilates transformation helped relieve this tightness and brought length back into my compressed spine.

Whether you have hip issues or not, Pilates will challenge your body in a new way and educate you about your own body. If you are apprehensive like I was, I encourage you to break out of your comfort zone and try it! If you are interested in scheduling a free introductory session please email me, Jenna Greenfield, at jgreenfield@ffc.com.

Post written by FFC South Loop Pilates Instructor Jenna Greenfield.

Try FFC for free in Chicago

10 Best Types of Push-Ups and How to Master Them

The push-up is commonly associated with military conditioning, gym class, and some martial arts. For many, they can feel like an impossible or even gruesome exercise. If you feel similarly, we hope you will feel empowered to incorporate this versatile and efficient exercise into your workout routine after reading this post.

Push-ups are categorized as a calisthenic exercise performed face down, during which the body is raised and lowered with the arms. Push-ups are a full body exercise that engages many muscles. Push-ups use your pectoral muscles, triceps, and other muscles of the shoulder area such as anterior deltoids, serrates anterior and coracobrachialis. Push-ups also use the transverse abdominis and rectus abdominis, making it a great core exercise.

Related: Need something for the lower body? We’ve got you covered here.

Push-ups can be performed in a number of ways, with modifications for beginners and progressions for those who are more advanced. We’ve compiled a list of the top 10 types of push-ups and their benefits so you can find an exercise that work best for you.

Standard Push-Ups

To perform a standard push-up, get into plank position with your hands under your shoulders, engage your core and keep your chest lifted and eyes gazing out in front of you so that your spine stays in a neutral position.

Bend your elbows and lower your body to the floor with your inhale, then push up with control and exhale as you rise back to a neutral position. Don’t let your backside dip or stick up, your body should remain in a straight line from head to toe.

Draw your shoulder blades back and down, keeping elbows tucked close to your body. It’s important to practice good form consistently to avoid injury and yield greater results.

Need further guidance on mastering the standard push up? Check out the video below from FFC Personal Trainer Tom Feeney!

Modified Push-Ups

The modified push-up is a great option for beginners. This type of push-up is performed by supporting the lower body on the knees instead of the toes.

The Wall Push-Up

Another great push-up variation for beginners is the wall push-up. This exercise is performed by standing close to a wall and then pushing away from the wall. You can increase the difficulty by moving your feet farther from the wall.

The Diamond Push-Up

For these push-ups, place both palms on the ground so that both thumbs and pointer fingers are touching and form a diamond. These push-ups really work your triceps!

The Wide Push-Up

Start from a normal push-up position but spread your hands wider than shoulder length. This will force your chest to do most of the work.

The Narrow Push-Up

From a normal push-up position, place your hands just a few inches apart from each other underneath your chest.

The One Leg Push-Up

From the standard push-up position, lift one leg up off the ground. Perform a set of push-ups and then switch legs to complete the set. Be sure to engage your core to help you stay in position!

The One Arm Push Up

Get into position and bring one arm behind your back or to your side. Complete the movement, switch arms and complete the set. These are a great challenge!

The Feet Elevated Push-Up

Do a normal push-up, but with your feet elevated on a box or bench. The higher the platform, the more you’ll work your shoulders, chest, and core. For an added challenge, use an exercise ball.

The Body Elevated Push-Up

Performed with hands on an elevated platform, commonly seen with medicine balls. For an even more advanced exercise, you can also elevate the feet.

Fun Facts About Push-Ups:

  • In most forms of push-ups, you are lifting 65% of your body weight
  • The record for the most consecutive push-ups is 10,507 by Minoru Yoshida of Japan in 1980.
  • Push-ups dates back to 1905
  • The record for the most push-ups done in 24 hours (non-consecutively) is 46,001 by Charles Servizio of the USA in 1993.
  • The Fence Lizard demonstrates push-ups to attract its reptilian mates

Post written by Jessica Frank. Edited by Natalie Casper. Video content by FFC Personal Trainer Tom Feeney.